
Please note: This archive article still has some relevance for users of Opencart 1.5.6.4 and earlier versions. However, the methods to connect newer versions of Opencart to Authorize.net are different. In addition, we recommend that new stores consider Stripe as a payment processor for use in Opencart.
One of the largest and most popular payment gateways on the Internet is Authorize.net. Opencart has out-of-the-box support for their Advanced Integration Method or AIM for short. This particular solution is excellent to enable credit card processing on your own site without having the customer go anywhere else at checkout. The customer enters their data on your site and invisibly that data is submitted to Authorize.net through a secure communication between your server and theirs. The customers credit card information is not stored in your local database or anywhere on your local server. This is important as it removes the threat of revealing your customers credit card information if your site is hacked or database compromised. Since the actual card data is not stored by you, it cannot be stolen from you.
One requirement for using AIM with Opencart is that your website must connect securely with Authorize.net. This means you need to be running the checkout portion of your store with a URL that begins with https://.
 From within the Opencart administration area, hover over Extensions and choose the ‘Payments’ menu selection.
So how do you setup Opencart with Authorize.net?
Find Authorize.net (AIM) in the list of payment options. On the far right, if the extension has yet to be installed there will be an ‘install’ link. Click it. Once installed you should see two links ‘Edit’ and ‘Uninstall’. Click the ‘Edit’ link.
In the Authorize.net extension settings we will enter in the necessary data to connect Opencart to your Authorize.net account.
If you haven’t already setup your API Login ID and Transaction Key at Authorize.net, you will need to do that next.
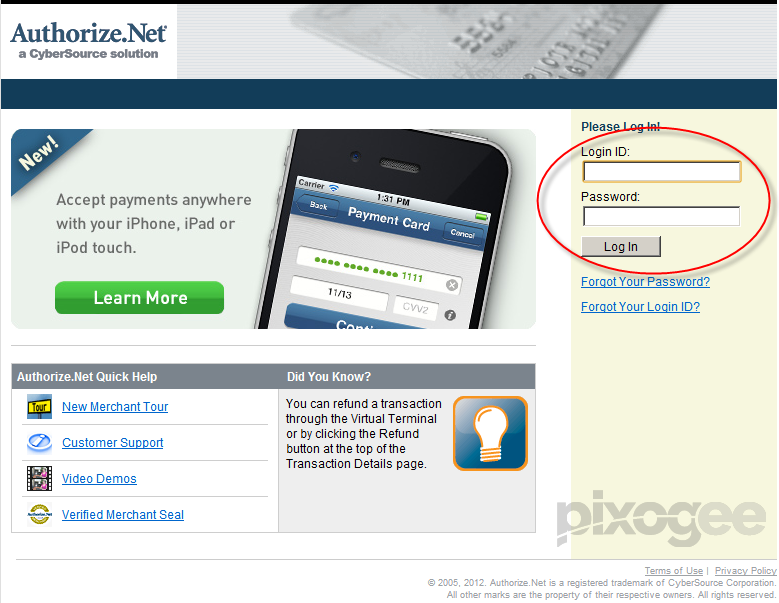
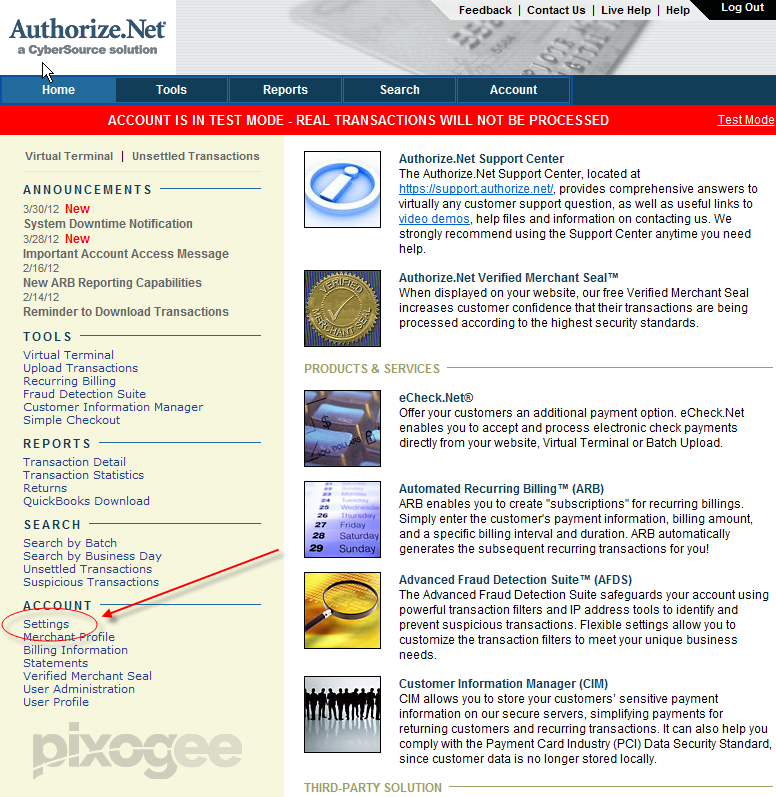
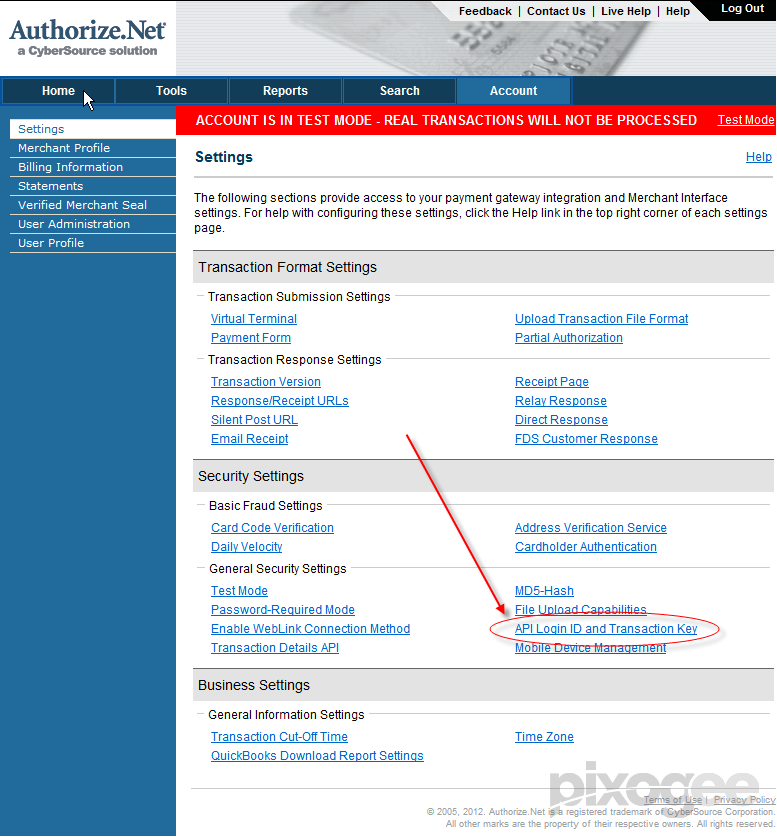
Go to Authorize.net. Login to your account with the credentials that Authorize.net provided for you at sign-up. Once logged in, click the ‘Settings’ link under the ‘Account’ Subheading menu on the left hand side. Once in Settings, under the ‘Security Settings’ sub-heading you should see an ‘API Login ID and Transaction Key’ link.
Please note: If you do not see the ‘API Login ID and Transaction Key’ link, it is possible that the account does not have adequate permissions which is possible when you’re doing work for a client with an Authorize.net account and you’re a web developer doing work for them. Likely what happened is the client setup a user account for you to administer their account and connect their website with the payment gateway but when setting up the user, the client didn’t provide all necessary permissions for the developer to do their work. If this is your situation, have your client double check the permission settings. There are numerous easy to follow video tutorials provided at http://www.authorize.net/videos/ that your client can use to figure out how to manage user accounts in Authorize.net.
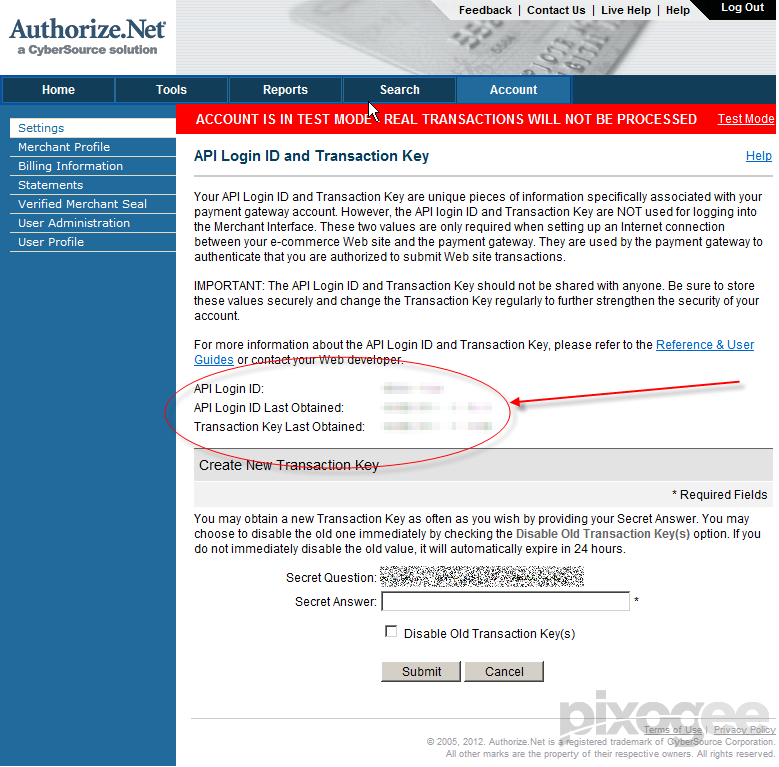
 Click the ‘API Login ID and Transaction Key’ link. If you have yet to create an API Login ID, you will simply see a form asking you a secret question that you set when you signed up. Enter the answer to the secret question and click ‘Submit’. The next page will show you your API Login ID and Transaction Key. Print this page (Ctrl + p on Windows or Command + p on a Mac) for your records. The transaction key cannot be viewed again anywhere on the Authorize.net site, so it is important that you have a copy of this key and that you keep that copy safe from prying eyes. Don’t share it with anyone unless on a need to know basis. If you’re working with a web developer you trust, they would qualify as someone who needs to know.
Now that you have your API Login ID and Transaction Key, we can go back to the Opencart Administration area to fill in the necessary details. Again, on the Authorize.net settings page in Opencart, fill in the Login ID which is your API Login ID from Authorize.net. Then enter the transaction key also provided by Authorize.net. The MD5 Hash field is not required for the AIM method so you can skip that field. For now, choose the ‘Live’ selection from the Transaction Server select box. Also choose ‘Live’ for the Transaction Mode select box. For the transaction method, you need to make a decision based on your business type.
The Transaction Method has two options, Authorization and Capture. What are the differences between these two methods?
 Authorization only authorizes an amount on the customers card. Basically, it checks to see if the amount is available on the customers card and places a temporary hold on the funds. It does not actually charge the card in the sense of pulling money off of it but freezes an amount temporarily. Why would a store want to do this as opposed to charging the full amount immediately? Some business types need to authorize and amount first as the full amount of the charge is unknown at the time of processing. A good example of this is a gas station. When you pull up to a fueling station, the machine nor you know how much gas you’re going to purchase if you want to fill your tank. When you slide your credit card through the gas pump, it authorizes or temporarily freezes an amount on that card. Once you have completed filling your tank and end the transaction the temporary freeze is lifted and the actual amount of the fuel will be ‘Captured’ on your card. Sometimes this process can take a couple of days. So if you review your credit card statement online, you may see a temporary freeze on funds that is different than the actual amount of the fuel purchase. Once the actual amount is fully captured, the frozen amount is released.
Another common example would be a restaurant that accepts tips. When paying with the credit card, the restaurant only authorizes the amount of the food bill plus tax. However, when you get the card back at the table and fill in a tip amount, the restaurant will then capture the full amount with tip.
So why would an online business selling products via e-commerce perhaps want to only ‘Authorize’ instead of ‘Capture’ an amount. If you sell something where the customer needs some hands on assistance in making a purchase. For instance, you sell specialty parts for automobiles and it may be fairly common that the customer chooses the wrong part for their application. It may be better to ‘Authorize’ only until you can check that the correct part is ordered or perhaps guide the customer along while choosing their items.
 Some stores that sell larger or expensive items which require a custom shipping solution or complicated selections of options might benefit from ‘Authorize’ only until variables are considered. If you have a store that sells very limited items or custom items that may or may not be stocked at the time of order may benefit from this selection too.
That being said, most e-commerce stores selling straight-forward merchandise will want to use the ‘Capture’ method. It is definitely the most common selection for small mom and pop businesses.
The total field allows you to set an minimum amount before the payment method is allowed on a specific order. For instance, you might only want Paypal to be used for very small purchases that are less than a specific amount. Enter the minimum amount allowed before this payment option is enabled. If you leave this field blank, it will always display this payment option on the checkout page. If you have no other payment solution in place and want Authorize.net to process everything, leave this field empty.
The order status field allows you to set a status once a order is made. Unless you have some unorthodox way of doing business, I recommend you set this field to ‘Processing’. All this does it set the status in Opencart. It doesn’t tell Authorize.net to process something. It just tells Opencart that when an order is successfully processed (payment is successfully authorized or captured) to set the Order Status to Processing.
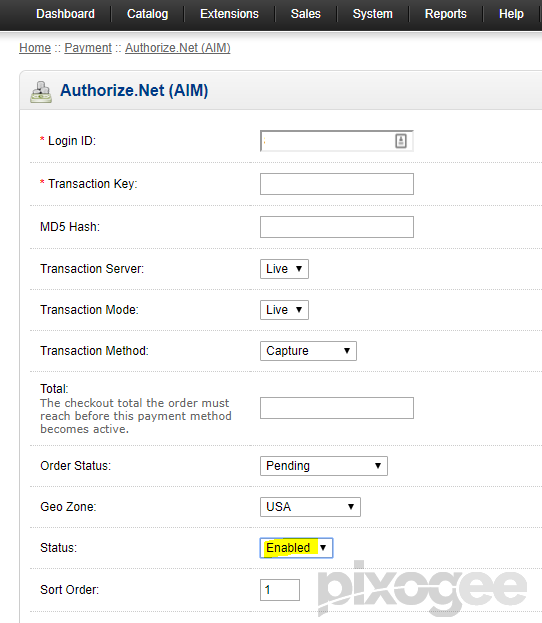 The Geo Zone field should be set at All Zones unless you want to use certain payment processors for specific parts of a country or specific parts of the world. Most stores would use All Zones.
To enable this payment option in the store, choose ‘Enabled’ in the Status select menu. If you ‘Disable’ temporarily though, your credentials will be saved in the system. You will not lose the data you already entered.
Finally set the Sort Order to 1 unless you have multiple payment options. Then set that number to the number you want it to sort by in all enabled payment solutions. If you want Paypal to show first, then set Paypal to 1 and Authorize.net to 2 and so on.
I usually recommend running one test order on the live site. Make sure your Authorize.net account is not in ‘Test Mode’ but in ‘Live Mode’. I usually create a $1.00 test product and go through the steps to purchase it in Opencart. After checkout, you should see the transaction in your Authorize.net account. Once successful, go back and disable the test product so it doesn’t show to your regular customers.
That’s it! Congrats! You just setup your store to connect securely with Authorize.net. Now you’re ready to start selling with real world ‘on your own site’ credit card processing with Opencart and Authorize.net.
Leave A Comment